

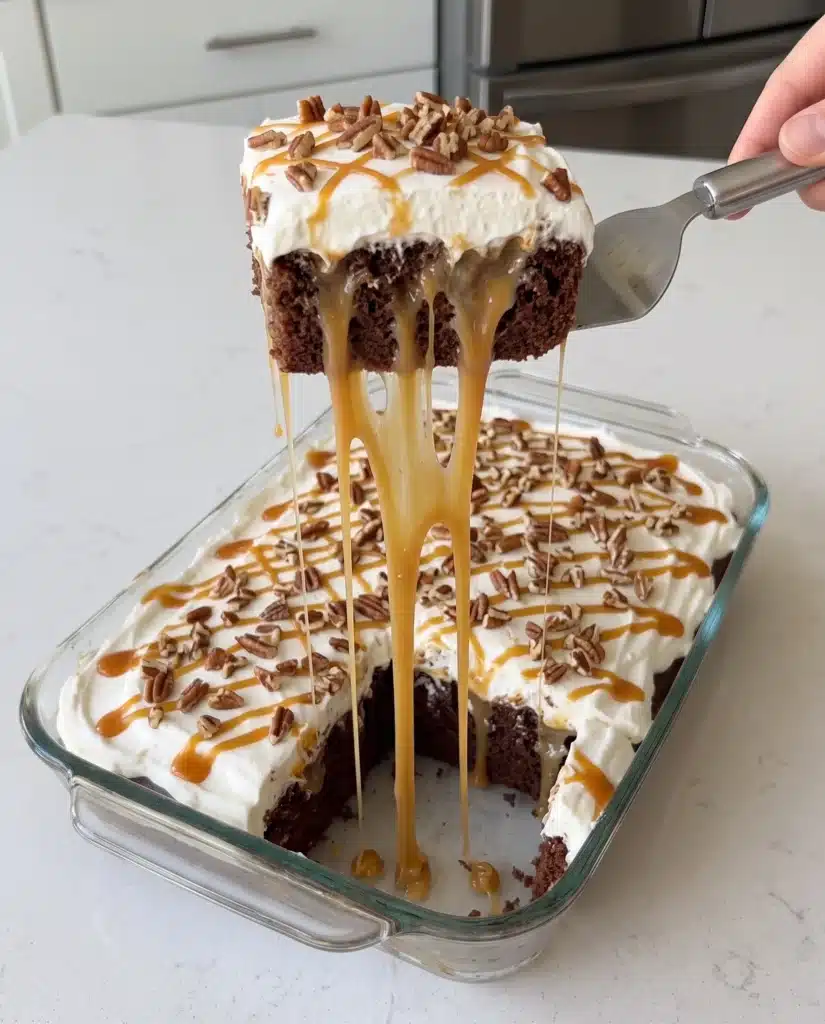
Decadent, rich, and deeply comforting, this Turtle Poke Cake transforms a simple chocolate base into an extraordinary dessert experience. Imagine a deeply fudgy chocolate cake, pierced and flooded with sweet, creamy condensed milk and ribbons of buttery caramel. As the cake cools, it absorbs these rich liquids, creating a dense, brownie-like crumb that practically melts in your mouth. To balance the intense sweetness, a thick layer of light, fluffy whipped cream is swooped over the top, followed by a generous scattering of crunchy chopped pecans and a final drizzle of golden caramel.
This dessert captures all the classic flavors of beloved turtle candies—chocolate, caramel, and pecans—but reinvents them in a format that is incredibly easy to slice and share. The contrasting textures are what make this dish truly stand out. You get the soft, syrup-soaked cake, the airy whipped cream, and the satisfying crunch of toasted nuts in every single bite. It is a brilliant dessert for entertaining because it actually improves as it sits in the refrigerator, allowing the flavors to meld and the cake to become perfectly saturated. Whether you are serving it at a summer barbecue, a holiday gathering, or a casual weekend dinner, this cake is guaranteed to leave a lasting impression.
Why You’ll Love This Recipe
- Unbeatable Moisture: By pouring sweetened condensed milk and caramel directly into the warm, freshly baked cake, the crumb absorbs the liquids like a sponge. This guarantees that every single slice is incredibly moist, gooey, and rich.
- Simple Preparation: Relying on everyday pantry staples and accessible ingredients keeps the preparation fast and stress-free. You do not need to be an expert baker to achieve flawless, bakery-quality results.
- Perfect for Make-Ahead Planning: Because the cake needs time to chill and absorb the filling, it is the ideal dessert to make a day in advance. The flavors and texture actually improve after a night in the refrigerator.
- Familiar, Crowd-Pleasing Flavors: The classic combination of chocolate, caramel, and pecans is universally loved. The contrast between the rich base and the light whipped topping appeals to a wide variety of palates.
- Beautiful Presentation: The rustic swoops of bright white whipped cream contrasting with the dark chocolate cake, amber caramel drizzles, and toasted nuts create a striking visual that looks beautiful on any dessert table.
Ingredients You’ll Need
For the Cake
- 1 (15.25-ounce) box chocolate cake mix (such as Devil’s Food or Fudge)
- 1 cup water
- 1/2 cup vegetable oil
- 3 large eggs
For the Filling
- 1 (14-ounce) can sweetened condensed milk
- 1 (12-ounce) jar thick caramel sauce, divided
For the Topping
- 2 cups heavy whipping cream, very cold
- 1/4 cup powdered sugar
- 1 teaspoon pure vanilla extract
- 1 cup chopped pecans
The secret to this recipe’s incredible texture lies in the combination of the sweetened condensed milk and the thick caramel sauce. Sweetened condensed milk is essentially cow’s milk from which the water has been removed and sugar has been added, resulting in a thick, sweet syrup. When poured over a warm cake, it acts as an enriching agent, transforming an ordinary box mix crumb into a dense, fudge-like dessert. The caramel sauce adds a distinct, buttery depth that mimics the chewy center of a classic turtle candy.
Ingredient Notes and Substitutions
Choosing the right type of caramel sauce is crucial for the success of this recipe. You want a thick, rich caramel dessert topping usually sold in a glass jar near the ice cream, rather than a thin caramel syrup that comes in a squeeze bottle. Thin syrups will dissolve too quickly into the cake and fail to provide the necessary gooey texture. If you prefer, you can easily substitute the store-bought caramel with an equal amount of homemade salted caramel sauce for an even more elevated flavor profile.
If you are short on time, you can replace the heavy whipping cream, powdered sugar, and vanilla extract with one 8-ounce tub of thawed store-bought whipped topping. While fresh whipped cream offers a superior, lightly sweetened dairy flavor that cuts through the richness of the cake, a prepared whipped topping is a perfectly acceptable and convenient alternative.
For the nuts, pecans are the traditional choice for a turtle-inspired dessert. However, if you do not have pecans on hand, chopped walnuts make an excellent substitute, offering a similar earthy crunch that pairs beautifully with the chocolate and caramel.
Equipment Needed
- 9×13-inch baking dish (glass or ceramic preferred)
- Large mixing bowl
- Electric hand mixer or stand mixer (for the cake and the whipped cream)
- Wooden spoon with a round handle
- Offset spatula or butter knife
- Wire cooling rack
How to Make the Recipe
- Preheat the oven and prepare the pan: Preheat your oven to 350°F (175°C). Lightly grease your 9×13-inch baking dish with nonstick baking spray and set it aside.
- Mix the cake batter: In a large mixing bowl, combine the dry chocolate cake mix, water, vegetable oil, and large eggs. Beat the mixture with an electric mixer on medium speed for about 2 minutes, stopping to scrape down the sides of the bowl with a silicone spatula, until the batter is completely smooth and cohesive.
- Bake the cake: Pour the chocolate cake batter into the prepared baking dish, spreading it into an even layer. Bake on the center rack of the oven for 25 to 30 minutes. You will know the cake is done when the edges pull slightly away from the sides of the pan and a toothpick inserted into the center comes out clean or with a few moist crumbs attached.
- Poke the holes: Remove the cake from the oven and place it on a wire cooling rack. While the cake is still hot, use the round, blunt handle of a wooden spoon to poke holes all over the surface of the cake. Space the holes about one inch apart, pressing down firmly but stopping just before you hit the bottom of the pan.
- Pour the sweet filling: Immediately pour the entire can of sweetened condensed milk evenly over the surface of the warm cake. Use a spatula to gently push the milk into the poked holes. Next, measure out 3/4 cup of the caramel sauce and drizzle it evenly over the cake, allowing it to pool and sink into the holes alongside the condensed milk. Reserve the remaining 1/4 cup of caramel for the topping.
- Cool and chill the cake: Allow the cake to cool at room temperature for 1 hour. Once it has reached room temperature, cover the dish tightly with plastic wrap and transfer it to the refrigerator to chill for at least 2 hours. This chilling step is essential to allow the cake to absorb the liquids and firm up.
- Prepare the whipped topping: Shortly before you are ready to serve, pour the cold heavy whipping cream into a large, chilled mixing bowl. Add the powdered sugar and vanilla extract. Beat the mixture on medium-high speed for 3 to 4 minutes, until stiff, fluffy peaks form. Be careful not to over-whip, or the cream will turn grainy.
- Frost the cake: Remove the chilled cake from the refrigerator. Spoon the freshly whipped cream onto the center of the cake and use an offset spatula to spread it into a thick, even layer all the way to the edges.
- Garnish and serve: Sprinkle the chopped pecans evenly over the whipped cream. Finally, drizzle the reserved 1/4 cup of caramel sauce in a decorative pattern over the nuts. Slice into generous squares and serve cold.
Tips for the Best Results
- Poke the cake while it is warm: For the most saturated, gooey texture, you must poke the cake and pour the filling over it within minutes of taking it out of the oven. A warm cake has an open crumb structure that acts like a sponge, eagerly soaking up the sweetened condensed milk and caramel. If you wait until the cake cools, the liquids will just pool on the surface and make the top soggy.
- Do not pierce all the way to the bottom: When creating the holes with your wooden spoon handle, apply gentle pressure and stop about a quarter-inch from the bottom of the baking dish. If you poke completely through the cake, the heavy syrups will drain straight to the bottom of the pan, leaving the cake itself dry and creating a sticky, stubborn layer stuck to the glass.
- Warm your caramel slightly: If your jarred caramel sauce is very stiff or has been stored in the refrigerator, microwave it in a safe bowl for 10 to 15 seconds. It should be fluid enough to pour easily and seep into the holes, but not so hot that it becomes watery.
- Toast the pecans for better flavor: While you can use raw chopped pecans, spending five minutes toasting them in a dry skillet over medium heat will drastically improve their flavor. Toasting releases the natural oils in the nuts, providing a deeper, earthier taste and a much crispier texture that holds up better against the soft whipped cream.
- Allow ample chilling time: Do not rush the refrigeration step. The cake needs a minimum of two hours in the fridge to properly absorb the condensed milk and caramel. Cutting into it too soon will result in a messy, crumbling cake with puddles of syrup, rather than a cohesive, fudge-like slice.
- Whip the cream to stiff peaks: Because the whipped cream has to support the weight of the pecans and the caramel drizzle, make sure you beat it until it holds firm, stiff peaks. Soft peaks will collapse under the garnishes, resulting in a flat, runny topping.
Common Mistakes to Avoid
- Poking holes with a fork: A standard dining fork creates holes that are far too narrow for the thick condensed milk and caramel to penetrate. Always use the round handle of a wooden spoon or a similarly sized dowel to create holes wide enough to act as reservoirs for the rich filling.
- Frosting a warm cake: If you apply the whipped cream before the cake is completely cooled and chilled, the dairy will melt instantly, sliding off the edges and creating a milky puddle. Patience is key; the cake must feel cold to the touch before the topping is added.
- Using thin caramel syrup: Avoid the thin, watery caramel syrups designed to quickly squirt over ice cream. They lack the body and rich butterfat needed to create the signature gooey pockets inside the cake. Stick to thick dessert sauces sold in jars.
- Overbaking the base cake: Because you are adding so much moisture to the cake later, it is crucial not to dry it out in the oven. Check the cake at the 25-minute mark. Overbaked chocolate cake will crumble when poked and struggle to absorb the heavy syrups smoothly.
Serving Suggestions
Because this dessert is intensely rich and sweet, it pairs beautifully with beverages that offer a touch of bitter contrast. Serve generous squares alongside a freshly brewed pot of dark roast coffee, a shot of strong espresso, or a glass of cold, unsweetened milk.
This dish is a fantastic option for large gatherings, neighborhood potlucks, and summer barbecues because it is served cold straight from the baking dish, eliminating the need for delicate plating or warm holding temperatures. To make the presentation even more special, you can serve each slice with an extra pinch of flaky sea salt on top to cut through the sweetness of the caramel.
Storage and Reheating
Proper storage is important to maintain the delicate whipped cream topping and prevent the cake from absorbing off-flavors from the refrigerator. Keep the cake in its original baking dish and cover it tightly with plastic wrap or a fitted lid. Alternatively, you can transfer individual slices to an airtight storage container. Stored properly in the refrigerator, the cake will remain fresh, moist, and delicious for up to 4 days.
Due to the fresh whipped cream, freezing the fully assembled cake is not recommended, as the cream will separate and become watery upon thawing. However, you can freeze the cake base after it has been baked, poked, and filled with the condensed milk and caramel. Wrap the chilled, unfrosted cake tightly in a double layer of plastic wrap and freeze for up to 2 months. Thaw overnight in the refrigerator, then add the fresh whipped cream, pecans, and caramel drizzle just before serving. This cake is designed to be eaten cold and should not be reheated.
Frequently Asked Questions
Can I make this recipe ahead of time?
Yes, this is an excellent make-ahead dessert. In fact, preparing it 12 to 24 hours in advance yields the best results. The extended resting time in the refrigerator allows the chocolate cake crumb to fully hydrate and absorb the sweet fillings, creating an incredibly rich, fudge-like texture that slices beautifully.
Can I use a homemade chocolate cake base instead of a box mix?
Absolutely. If you have a favorite homemade chocolate cake recipe that fits a 9×13-inch pan, you can easily substitute it for the box mix. Just be sure to bake your homemade cake until a toothpick comes out clean, and follow the same instructions for poking and filling while the cake is still warm from the oven.
Why did my cake turn out soggy instead of fudgy?
A soggy cake is usually the result of poking the holes completely through to the bottom of the pan, causing the condensed milk and caramel to pool underneath the cake rather than remaining suspended within the crumb. It can also happen if the cake was underbaked before the liquids were added.
Can I use a different type of nut?
Yes. While pecans are traditional for a turtle flavor profile, chopped walnuts, toasted hazelnuts, or even roasted peanuts make fantastic substitutions. If you have a nut allergy in the family, you can omit the nuts entirely and substitute them with mini chocolate chips or toffee bits to retain a pleasant crunch.
Do I have to use sweetened condensed milk?
Sweetened condensed milk is a signature ingredient in traditional poke cakes because its thick, viscous texture clings to the cake crumb beautifully. Evaporated milk is too thin and will make the cake watery, while plain heavy cream lacks the necessary sweetness and binding properties. For the intended texture, sweetened condensed milk is highly recommended.
How do I know when the cake is done baking?
Since oven temperatures vary, it is best to rely on visual cues rather than time alone. The cake is done when the edges have pulled slightly away from the sides of the baking dish, the center springs back gently when lightly pressed, and a toothpick inserted into the middle comes out with only a few moist crumbs.
Final Thoughts
Creating a show-stopping dessert does not require hours of complicated baking techniques or hard-to-find ingredients. By combining a simple chocolate base with rich, creamy liquids and contrasting crunchy garnishes, you can produce a bakery-worthy treat in your own kitchen. Whether you are baking for a special occasion or simply craving something sweet, this Turtle Poke Cake is guaranteed to satisfy any chocolate and caramel lover. Give this method a try, and enjoy the perfect balance of gooey fudge, fluffy cream, and toasted crunch in every single bite.