

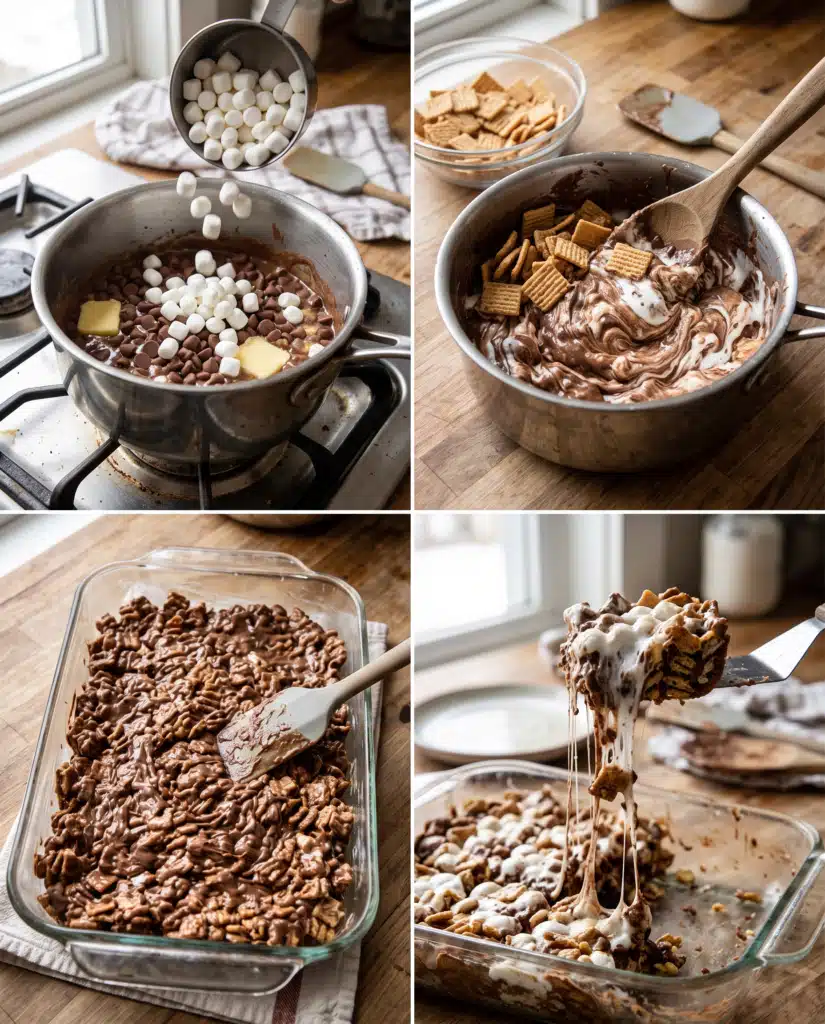
Imagine sinking your teeth into a thick, chewy square that captures the exact essence of a warm campfire treat, no open flame required. These No-Bake Golden Grahams S’mores Bars combine the honey-kissed crunch of graham cereal with a rich, buttery chocolate base and ribbons of sticky, sweet marshmallow cream. The texture offers a deeply satisfying contrast between the crisp, structured cereal pieces and the soft, stretchy pockets of minimally melted marshmallows. Every bite delivers the nostalgic, toasted sugar and cocoa flavors you expect from a classic summer dessert, transformed into a highly manageable, sliceable format.
Whether you are preparing a quick afternoon snack for the family, assembling a dessert platter for a neighborhood block party, or simply craving a sweet, comforting bite on a quiet evening, these bars fit the occasion beautifully. What makes this recipe highly practical is its complete reliance on the stovetop. You bypass the complex techniques of traditional baking, avoiding the need to preheat an oven or measure out leavening agents. By utilizing a handful of standard pantry staples and a single large pot, you can create a bakery-quality dessert in a matter of minutes. The visual appeal of the swirled chocolate and bright white marshmallow stretching apart as you pull a square from the pan makes this dish as enjoyable to look at as it is to eat.
Why You Will Love This Recipe
There are numerous reasons to keep this straightforward, reliable dessert in your regular rotation. Here is why you will find yourself returning to this recipe:
- Simple Preparation: You only need one large pot and a baking dish. The process involves basic melting and stirring, meaning anyone who can operate a stovetop can master this dessert on the first try.
- Accessible Ingredients: The entire ingredient list consists of items readily available in the baking and breakfast aisles of any standard grocery store.
- Family-Friendly Flavor: The combination of honey graham flavors, creamy milk chocolate, and sweet vanilla marshmallow is universally appealing, making it a reliable choice for gatherings with diverse tastes.
- Quick Assembly: From gathering your ingredients to pressing the final mixture into the pan, the active preparation time is remarkably brief.
- No-Bake Convenience: During warm seasons when you want to keep your kitchen cool, this stovetop method provides a fantastic dessert solution without generating excess heat.
- Exceptional Texture: The method of reserving some marshmallows to fold in at the very end ensures you get distinct, fluffy pockets of marshmallow rather than a uniform, overly dense block.
Ingredients You Will Need
Gather the following components before you begin. Having everything measured and ready near your stove will make the quick melting process smooth and highly organized.
For the Base and Coating
- 1/2 cup unsalted butter
- 1 1/2 cups milk chocolate chips
- 1 package (10 ounces) mini marshmallows, divided
- 1 teaspoon pure vanilla extract
For the Crunch
- 5 cups honey graham cereal (such as Golden Grahams)
Understanding the Ingredients
The unsalted butter provides a rich, savory background that tempers the intense sweetness of the sugars. It also thins the chocolate slightly and coats the cereal, helping to keep the final squares soft, pliable, and easy to chew.
The milk chocolate chips melt down to form the primary flavor base. Milk chocolate offers a sweeter, creamier profile that closely mimics the traditional chocolate bars used in classic campfire treats.
The mini marshmallows act as both the binder and a key textural element. By dividing them, you use the first half to melt into the butter and chocolate, creating a sticky, cohesive sauce. The second half remains mostly intact, providing bursts of soft, fluffy texture throughout the firm cereal.
The honey graham cereal supplies the crucial structural integrity and the signature crunch. Its sturdy, ridged shape holds up well against the warm chocolate mixture without becoming soggy, ensuring the dessert maintains a pleasant bite.
Ingredient Notes and Substitutions
Adapting these No-Bake Golden Grahams S’mores Bars to suit your pantry inventory is quite straightforward. Keep these practical substitutions and their resulting effects in mind:
- Salted Butter: If you only have salted butter on hand, you can confidently use it. The added salt will actually enhance the overall flavor profile by providing a sharper contrast to the sweet marshmallows and chocolate.
- Chocolate Variations: For a less sweet dessert, substitute the milk chocolate chips with semi-sweet or dark chocolate chips. Dark chocolate will create a richer, slightly more bitter contrast that appeals heavily to adult palates.
- Standard Marshmallows: If you can only locate standard-sized marshmallows, you must cut them into quarters using kitchen shears before beginning. Large marshmallows take significantly longer to melt, which increases the risk of scorching the chocolate while you wait for them to break down.
- Adding Mix-Ins: For an extra layer of flavor and crunch, you can stir in a half cup of chopped, toasted pecans or walnuts when you add the cereal.
Equipment Needed
You do not need any specialized pastry equipment to achieve superb results. Ensure you have the following reliable kitchen tools ready:
- Large, heavy-bottomed saucepan or Dutch oven
- Sturdy heat-resistant silicone spatula
- 9×9-inch square baking dish
- A small square of parchment paper or wax paper (for pressing)
- Non-stick cooking spray or extra butter (for greasing the pan)
How to Make the Recipe
Follow these steps carefully to achieve a soft, chewy texture with a beautiful marbled appearance, rather than a hard, brittle block.
- Prepare the Baking Dish: Lightly coat the bottom and sides of your 9×9-inch baking dish with non-stick cooking spray or a thin layer of butter. This ensures the sticky marshmallow mixture will release cleanly when it is time to slice. Set the dish aside.
- Melt the Butter and Chocolate: Place your heavy-bottomed saucepan over low heat. Add the unsalted butter and the milk chocolate chips. Stir gently and constantly with your silicone spatula until the butter and chocolate melt together into a smooth, glossy liquid. Do not increase the heat, as chocolate scorches very easily.
- Create the Marbled Base: Once the chocolate is completely smooth, pour in exactly half of the mini marshmallows. Continue to stir gently over low heat for about one to two minutes. You want the marshmallows to soften and begin melting into the chocolate, creating thick, white, gooey ribbons throughout the dark base. Do not melt them completely; leave distinct streaks of marshmallow visible.
- Add Flavor and Cereal: Remove the saucepan from the heat entirely. Quickly stir in the pure vanilla extract. Immediately pour in the honey graham cereal. Fold the mixture together, scraping the bottom and sides of the pot, until the cereal pieces are evenly coated in the warm chocolate and marshmallow mixture.
- Incorporate the Remaining Marshmallows: While the mixture is still warm but slightly cooled from the cereal addition, add the remaining half of the mini marshmallows to the pot. Fold them in gently just until they are distributed throughout the cereal. You want these marshmallows to soften slightly from the residual heat but retain their distinct, round shape.
- Transfer to the Dish: Scrape the entire sticky, chunky mixture into your prepared baking dish. Spread it out roughly into an even layer using your spatula.
- Press Gently: Take your small square of parchment paper and place it flat against the top of the mixture. Using your hands, press down very lightly through the parchment paper to smooth the top and guide the dessert into the corners of the dish.
- Cool and Slice: Allow the dish to sit at room temperature for at least one hour to cool and set completely. Once firm to the touch, turn the block out onto a cutting board or cut directly in the pan into uniform squares.
Tips for the Best Results
Achieving that bakery-style stretch and chewiness requires a few very specific handling techniques. Keep these tips in mind as you construct your dessert:
- Control the Heat: Patience is critical when melting the base ingredients. Keep the stovetop heat strictly on low. Rushing the process with medium or high heat will cause the chocolate to seize into a grainy paste and the sugar in the marshmallows to harden, resulting in a dense, unpleasant texture.
- Use the Parchment Trick: Trying to press the sticky cereal mixture with your bare hands or a regular spoon will create a frustrating mess. Placing a square of parchment paper between your hands and the dessert prevents any sticking and gives you a smooth, even surface.
- Use a Gentle Touch: When pressing the mixture into the pan, apply only enough pressure to level the top. If you pack the cereal down tightly with heavy force, you will crush the graham squares and the finished bars will be tough and heavy.
- Reserve the Second Half: Do not ignore the instruction to divide the marshmallows. Adding them all at the beginning will result in a uniform, intensely sweet chocolate block without the signature visual appeal and soft texture of whole, intact marshmallows throughout the bars.
- Use a Heavy Pot: A heavy-bottomed pot distributes heat far more evenly than a thin aluminum pan, significantly reducing the risk of burning the sugars resting at the bottom of the mixture.
Common Mistakes to Avoid
Even an uncomplicated recipe has a few hidden pitfalls. Watch out for these common errors to ensure your dessert turns out wonderfully:
- Overcooking the Marshmallows: Leaving the saucepan on the heat until the first addition of marshmallows completely dissolves into a uniform liquid removes the beautiful marbled effect and alters the final chewiness. Pull the pot off the heat while distinct white streaks remain.
- Compressing the Mixture: As mentioned, pressing the mixture into the pan too aggressively eliminates the necessary air pockets between the cereal pieces, destroying the light, crispy texture you want to achieve.
- Using Stale Marshmallows: Marshmallows that have been sitting open in the pantry lose their moisture and will not melt down smoothly. Always use a fresh, newly opened bag for this recipe to guarantee a stretchy texture.
- Refrigerating to Cool: It can be highly tempting to speed up the setting process by placing the dish in the refrigerator. The cold air will cause the butter and chocolate to solidify rapidly, turning the cereal block rock-hard. Always let them set at natural room temperature.
Serving Suggestions
These No-Bake Golden Grahams S’mores Bars are robust and travel exceptionally well, making them an excellent candidate for packed lunches, outdoor picnics, or road trips. You can individually wrap them in wax paper and tie them with a piece of natural baker’s twine for a charming, rustic presentation at bake sales or casual parties.
If serving them at home, they pair beautifully with a tall glass of cold milk or a hot cup of unsweetened black coffee. The bitterness of the coffee cuts through the richness of the chocolate and the high sugar content of the marshmallows, creating a highly balanced flavor experience.
For a fun, elevated presentation during a summer barbecue, try placing a single square on a dessert plate and lightly toasting the top layer of exposed marshmallows with a handheld kitchen torch just before serving, bringing a genuine campfire aroma to the table.
Storage and Reheating
Proper storage guarantees your squares stay soft and pliable for several days after preparation.
Always store leftover dessert squares in an airtight container at room temperature. You can layer them with sheets of wax paper or parchment paper to prevent them from sticking to one another. When stored properly away from direct sunlight and household heat sources, they will maintain their best texture for up to four days. Do not store them in the refrigerator, as the chilled environment will make the butter and chocolate unpleasantly hard and difficult to bite into.
If you need to store them for a longer period, freezing is generally not recommended. The freezing and thawing process tends to alter the structure of the honey graham cereal, causing it to become somewhat soft and soggy rather than retaining its signature crunch.
If you find that your stored squares have become slightly stiff after a few days on the counter, you can easily restore their original gooeyness. Place a single square on a microwave-safe plate and heat it on medium power for roughly five to eight seconds. This brief burst of heat softens the butter, chocolate, and marshmallows just enough to make them stretchy and warm again without turning them into a melted puddle.
Frequently Asked Questions
Can I make this recipe ahead of time? Yes, you can easily make these bars a day in advance. Prepare them exactly as directed, let them cool completely at room temperature, and then cover the dish tightly with a fitted lid or plastic wrap. They will remain soft, crunchy, and fresh for the following day’s events.
Why did my treats turn out hard and dense? This issue is generally caused by two distinct errors: melting the chocolate and marshmallows over heat that is far too high, or pressing the final mixture too firmly into the baking dish. Always use the lowest possible heat setting and a very gentle hand when shaping the dessert in the pan.
Can I double the recipe for a larger crowd? You can double the ingredients successfully, but you will need a very large stockpot or Dutch oven to fold six cups of cereal evenly without spilling over the sides. You must also spread the doubled mixture into a larger 9×13-inch baking dish to ensure the bars are not unmanageably thick.
What is the best way to cut clean, even squares? Wait until the mixture is completely cool and firmly set at room temperature. Turn the solid block out onto a flat cutting board. Use a large, heavy chef’s knife coated very lightly with non-stick cooking spray. Press straight down firmly through the cereal rather than using a back-and-forth sawing motion, which can tear the marshmallows and crush the graham pieces.
Can I use a different type of cereal? While honey graham squares provide the authentic campfire flavor, you can substitute other sturdy cereals if necessary. Crisp rice cereal or toasted oat rings will work structurally, though they will entirely change the flavor profile away from the traditional dessert experience.
Do I have to use parchment paper to press them? While not strictly mandatory, attempting to press the sticky, warm chocolate and marshmallow mixture with a bare spatula or your hands will result in a frustrating amount of the dessert sticking to your tools. The parchment paper acts as a clean, non-stick barrier that makes leveling the pan exceptionally easy.
Final Thoughts
Creating a batch of these thick, gooey dessert squares is a highly rewarding process that requires minimal time and delivers maximum satisfaction. The classic combination of sweet marshmallow, crispy honey graham cereal, and rich milk chocolate remains a beloved favorite for very good reason. By keeping your stovetop heat low and your mixing technique gentle, you will easily master these No-Bake Golden Grahams S’mores Bars on your very first attempt. Gather your mixing bowls, grab a box of cereal, and bring the delightful taste of summer into your kitchen today.