

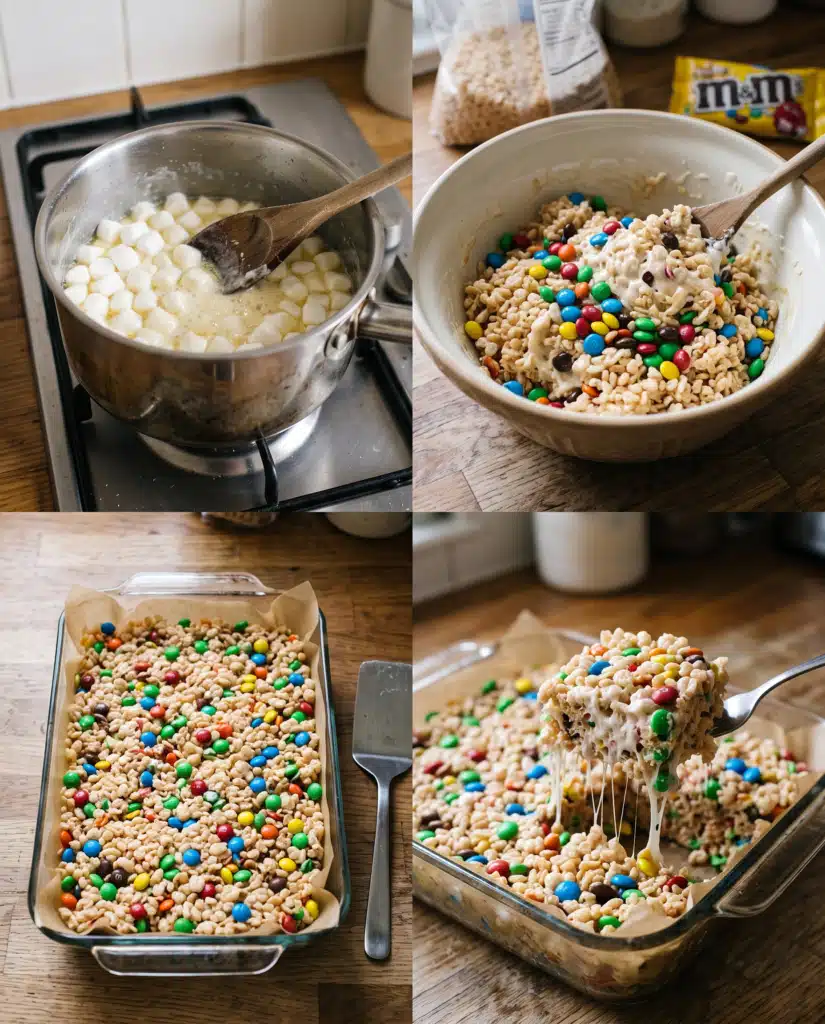
Imagine sinking your teeth into a thick, chewy square of toasted rice cereal, bound together by generous ribbons of melted, buttery marshmallows, and studded with brightly colored, crunchy candy shells. The contrast between the smooth, sticky marshmallow and the crisp snap of the cereal creates a deeply satisfying texture, while the chocolate candies add a rich cocoa note to the sweet vanilla base. This is a nostalgic, no-bake dessert that brings the joy of a childhood favorite right into your kitchen.
Whether you are preparing a quick after-school snack, putting together a dessert platter for a neighborhood block party, or simply craving a sweet, comforting bite on a rainy afternoon, these treats fit the bill beautifully. Because they require no oven time and use just a handful of standard pantry staples, they are highly practical for busy home cooks. You bypass the complex techniques of traditional baking and move straight to the rewarding process of stirring, pressing, and eating. The vibrant candies also make this dish visually striking, turning a simple cereal bar into a festive, celebration-ready dessert that brightens up any table.
Why You Will Love This Recipe
There are many reasons to keep this simple, reliable recipe in your permanent collection. Here is why you will find yourself making it time and time again:
- Simple Preparation: You only need a stovetop and a few basic mixing tools. There is no need to preheat an oven, sift flour, or worry about precise leavening agents.
- Accessible Ingredients: The required components are widely available at any grocery store, and you likely already have most of them sitting in your pantry.
- Family-Friendly Flavor: The familiar combination of toasted rice, sweet marshmallow, and milk chocolate appeals to all ages, making it a reliable crowd-pleaser for any gathering.
- Quick Assembly: From gathering your ingredients to pressing the final mixture into the pan, the entire active process takes roughly fifteen minutes.
- Customizable Colors: You can easily tailor this dessert for specific holidays, birthdays, or sporting events simply by swapping out the standard candies for seasonal color variations.
- No-Bake Convenience: During warmer months when you want to avoid heating up your house, this stovetop method provides a fantastic dessert solution without turning on the oven.
Ingredients You Will Need
Gather the following items before you begin. Having everything measured and ready will make the process smooth and enjoyable.
For the Base
- 1/2 cup unsalted butter
- 1 package (10 ounces) mini marshmallows
- 6 cups crisp rice cereal
For the Mix-Ins and Topping
- 1 cup milk chocolate candies
- 1/2 cup milk chocolate candies (reserved for the topping)
Understanding the Ingredients
The unsalted butter provides a rich, savory background that balances the intense sweetness of the sugars. It also coats the cereal and helps keep the final squares soft, pliable, and easy to chew.
The mini marshmallows act as the essential binder. When melted down slowly, they create a sticky, stretchy matrix that holds the cereal together while providing a distinct vanilla-sugar flavor. Mini marshmallows are preferred because their smaller surface area allows them to melt down much faster and more evenly than larger varieties.
The crisp rice cereal supplies the crucial structural integrity and the signature crunch. Its airy, toasted nature prevents the dessert from becoming overly heavy or dense.
The milk chocolate candies offer bursts of rich chocolate flavor and a secondary crunch from their sugar shells. Dividing them ensures you get chocolate evenly distributed throughout the center, as well as a beautiful, colorful presentation on top.
Ingredient Notes and Substitutions
Adapting this recipe to suit your pantry is straightforward. Keep these practical substitutions and their effects in mind:
- Salted Butter: If you only have salted butter available, you can easily use it. It will actually enhance the overall flavor by providing a sharper contrast to the sweet marshmallows.
- Large Marshmallows: If you can only find standard-sized marshmallows, they will work. However, you should cut them into halves or quarters using kitchen shears before melting to ensure they break down evenly without requiring excessive time on the stove.
- Alternative Cereals: You can swap out the crisp rice for other structured cereals, such as toasted oat rings or corn flakes. Keep in mind that denser cereals will change the texture, resulting in a heavier, firmer bar.
- Candy Variations: Peanut butter candies, mini chocolate chips, or butterscotch chips can be used in place of standard milk chocolate candies. If using mini chocolate chips, be aware they will melt much faster when folded into the warm mixture.
- Adding Extracts: For an extra layer of flavor, you can stir one teaspoon of pure vanilla extract into the melted marshmallow mixture right before adding the cereal.
Equipment Needed
You do not need any specialized pastry equipment to achieve bakery-quality results. Ensure you have the following tools ready:
- Large, heavy-bottomed saucepan or Dutch oven
- Sturdy wooden spoon or a heat-resistant silicone spatula
- 9×13-inch glass or ceramic baking dish
- A small square of parchment paper or wax paper (for pressing)
- Non-stick cooking spray or extra butter (for greasing the pan)
How to Make the Recipe
Follow these steps carefully to achieve a soft, chewy texture rather than a hard, brittle one.
- Prepare the Baking Dish: Lightly coat the bottom and sides of your 9×13-inch baking dish with non-stick cooking spray or a thin layer of butter. This ensures the sticky mixture will release cleanly later. Set the dish aside.
- Melt the Butter: Place your large saucepan over medium-low heat. Add the unsalted butter and allow it to melt completely. Do not let the butter brown or bubble vigorously.
- Melt the Marshmallows: Once the butter is fully melted, pour in the entire package of mini marshmallows. Stir continuously with your wooden spoon or silicone spatula. The marshmallows will slowly soften, blending with the butter into a smooth, cohesive, and glossy cream. As soon as the last lumps disappear, immediately remove the saucepan from the heat source.
- Incorporate the Cereal: Pour the crisp rice cereal directly into the warm marshmallow mixture. Gently fold the ingredients together, scraping the bottom and sides of the pot, until every single piece of cereal is evenly coated in the sticky marshmallow cream.
- Cool Slightly and Add Candies: Let the mixture sit in the warm pot for about two to three minutes. This brief resting period lowers the temperature just enough so the chocolate candies do not immediately melt upon contact. After resting, pour in the 1 cup of milk chocolate candies and fold them in gently until distributed throughout the cereal.
- Transfer to the Dish: Scrape the entire sticky mixture into your prepared baking dish. Spread it out roughly into an even layer using your spatula.
- Press Gently: Take your small square of parchment paper and place it flat against the top of the mixture. Using your hands, press down very gently through the parchment paper to smooth the top and guide the mixture into the corners of the dish.
- Add the Final Topping: Immediately scatter the remaining 1/2 cup of chocolate candies evenly across the top of the pressed mixture. Use the parchment paper to gently press these top candies down just enough so they adhere firmly to the sticky surface.
- Cool and Slice: Allow the dish to sit at room temperature for at least 45 minutes to 1 hour to cool and set completely. Once firm, turn the block out onto a cutting board or cut directly in the pan into uniform squares.
Tips for the Best Results
Achieving that bakery-style stretch and chewiness comes down to a few very specific techniques. Keep these tips in mind as you cook:
- Use Fresh Marshmallows: Stale marshmallows lose their moisture and will not melt down smoothly. Always buy a fresh bag for this recipe to guarantee a gooey, stretchy texture.
- Control the Heat: Patience is your best friend when melting the sugar. Keep the stovetop heat on medium-low or low. Rushing the process with high heat will cause the sugar in the marshmallows to harden, resulting in a dense, jaw-breaking dessert.
- Use the Parchment Trick: Trying to press the sticky cereal with your bare hands or a regular spoon will create a frustrating, sticky mess. Placing a square of parchment paper between your hands and the dessert prevents any sticking and gives you a smooth, even surface.
- Use a Gentle Touch: When pressing the mixture into the pan, apply only enough pressure to level the top. If you pack the cereal down tightly with heavy force, the finished squares will be tough and dense.
- Time the Candy Addition: If you add the chocolate candies while the marshmallow is boiling hot, the colorful candy shells will crack, and the chocolate will smear into muddy brown streaks. Waiting just a few minutes prevents this and keeps the colors vibrant.
Common Mistakes to Avoid
Even an easy recipe has a few hidden pitfalls. Watch out for these common errors:
- Overcooking the Marshmallows: Leaving the saucepan on the heat after the marshmallows have melted will quickly turn the sugars to a hard-crack stage. Remove the pot from the stove the exact second the mixture becomes smooth.
- Compressing the Mixture: As mentioned, pressing the mixture into the pan too aggressively eliminates the pockets of air between the cereal grains, destroying the light, chewy texture you want to achieve.
- Using a Small Pot: You need ample room to stir six cups of dry cereal without making a mess. Using a saucepan that is too small will result in uneven mixing and cereal spilling over the sides of the stove.
- Refrigerating to Cool: It can be tempting to speed up the setting process by placing the dish in the refrigerator. However, the cold air will cause the butter and sugar to solidify rapidly, turning the cereal block rock-hard. Always let them set at room temperature.
Serving Suggestions
These squares are robust and travel well, making them an excellent candidate for packed lunches, picnics, or road trips. You can individually wrap them in wax paper and tie them with a piece of baker’s twine for a charming, rustic presentation at bake sales or parties.
If serving them at home, they pair exceptionally well with a tall glass of ice-cold milk or a hot cup of unsweetened black tea, which cuts through the sweetness of the candy and marshmallow.
For a fun summertime variation, try slicing the treats into thinner rectangles and using two of them to sandwich a scoop of vanilla bean or chocolate ice cream. The chewy texture of the cereal holds up wonderfully against the cold ice cream.
Storage and Reheating
Proper storage guarantees your dessert stays soft and pliable for days.
Always store leftover squares in an airtight container at room temperature. You can layer them with sheets of wax paper or parchment paper to prevent them from sticking to one another. When stored properly away from direct sunlight and heat, they will maintain their best texture for up to three days. Do not store them in the refrigerator, as the chilled environment will make them unpleasantly hard and dry.
If you need to store them for a longer period, freezing is an option. Wrap each individual square tightly in plastic wrap, then place all the wrapped squares into a heavy-duty freezer bag. They can be frozen for up to six weeks. When you are ready to eat them, simply let them sit on the counter at room temperature for about thirty minutes to thaw completely.
If you find that your stored squares have become slightly stiff after a few days, you can restore some of their original gooeyness. Place a single square on a microwave-safe plate and heat it on medium power for roughly five to eight seconds. This brief burst of heat softens the butter and marshmallow just enough to make them chewy again without melting the chocolate candies.
Frequently Asked Questions
Can I make this recipe ahead of time? Yes, you can easily make these a day in advance. Prepare them as directed, let them cool completely, and then cover the dish tightly with plastic wrap or transfer the cut squares to an airtight container. They will remain soft and fresh for the following day.
Why did my treats turn out hard and dense? This is usually caused by two things: melting the marshmallows over heat that is too high, or pressing the mixture too firmly into the baking dish. Always use low heat and a very gentle hand when shaping the dessert.
How do I keep the chocolate candies from melting into a mess? The key is letting the hot marshmallow and cereal mixture rest off the heat for two to three minutes before folding in the candies. The mixture will still be warm enough to be pliable, but cool enough to leave the candy shells intact.
Can I double the recipe? You can double the ingredients, but you will need a very large stockpot to mix everything evenly, and you will need to spread the mixture across two 9×13-inch baking dishes. Do not try to press a double batch into a single pan, or they will be far too thick.
What is the best way to cut clean squares? Wait until the mixture is completely cool and set. Turn the block out onto a flat cutting board and use a large, sharp chef’s knife coated very lightly with non-stick cooking spray. Press straight down firmly rather than using a sawing motion.
Can I use a different size baking pan? Yes. If you prefer thicker, taller squares, you can press the mixture into an 8×8-inch or 9×9-inch square baking dish. Just remember to press gently, as thicker squares can easily become dense if packed too tightly.
Final Thoughts
Creating a batch of these cheerful, vibrant dessert squares is a rewarding process that requires minimal time and delivers maximum satisfaction. The combination of chewy marshmallow, crispy toasted rice, and rich chocolate candy is a classic for a reason. By keeping your heat low and your mixing gentle, you will master these M&M Rice Krispie Treats on your very first try. Gather your ingredients and bring a little bit of colorful nostalgia into your kitchen today.