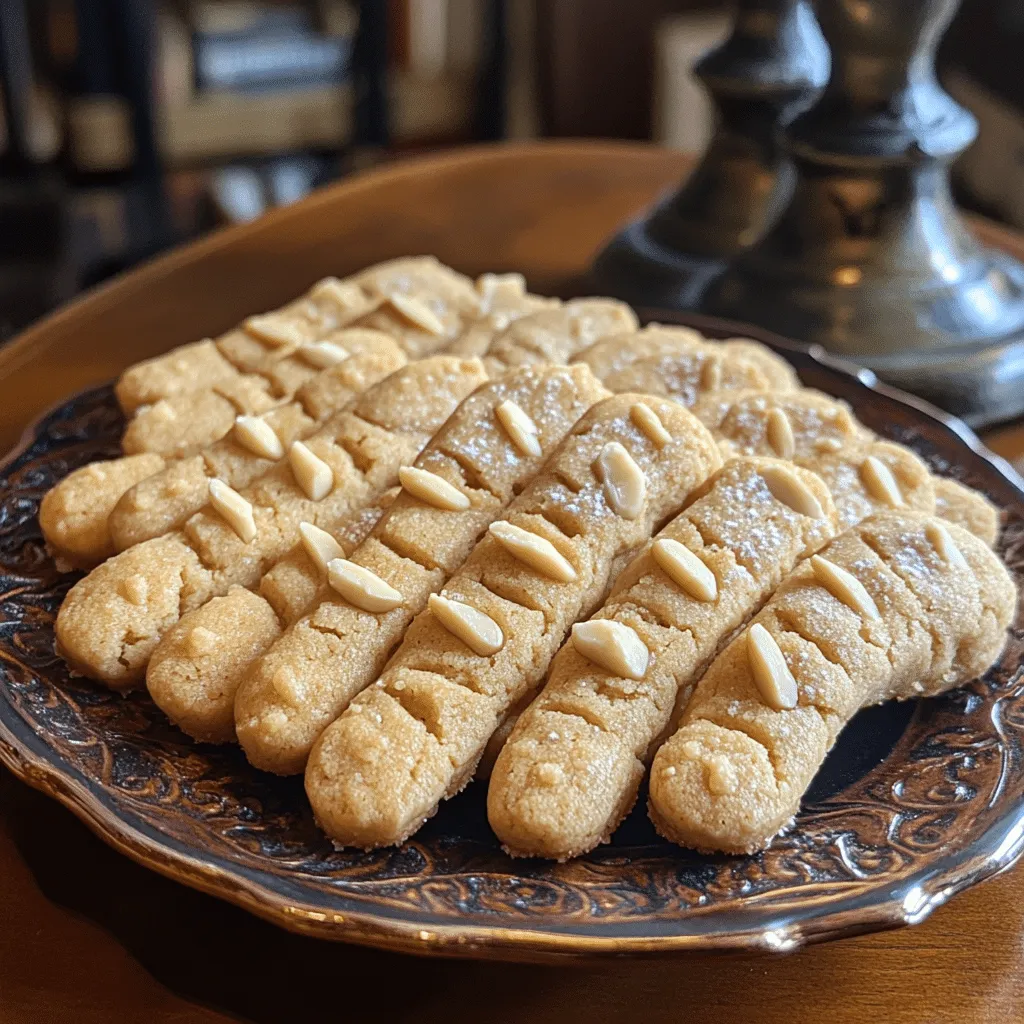
I cannot contain my excitement as I share my all-time favorite Halloween recipe with you: Witch Finger Cookies! I’ve whipped up these spooky treats so many times that I’ve lost count, and each batch seems to vanish faster than a ghost on Halloween night. Trust me, these cookies are not only a visual delight, but they also pack a punch in flavor and crunch with those delicious almond snap tips. Whether you’re throwing a Halloween bash or just looking to have some fun in the kitchen, these cookies are a game-changer! Let’s dive into the magic of making your own Witch Finger Cookies!
Why You’ll Love This Witch Finger Cookies
- Easy to Make: You don’t need to be a master baker to pull these off. Simple ingredients and easy steps mean you’ll be a cookie-making pro in no time!
- Versatile Design: You can easily customize the shape and size of your cookies to create your own spooky designs.
- Deliciously Irresistible: The combination of buttery cookies with crunchy almond tips is simply out of this world.
- Perfect for Parties: These cookies are sure to be a hit at any Halloween gathering, impressing guests with their eerie appearance and delightful taste.
- Make-Ahead Convenience: You can prepare the dough in advance and bake it fresh right before your event, making your life a lot easier!
The Secret to Perfect Witch Finger Cookies
The secret to achieving the perfect Witch Finger Cookies lies in the dough and the almond tips. Using cold butter keeps the cookies crispy and prevents them from spreading too much, giving you that perfect finger shape. I recommend chilling the dough for at least 30 minutes. This not only helps with shaping but intensifies the flavors as well. Trust me, this small step makes a huge difference! Additionally, choosing high-quality almonds for that snap tip is key; the crunch and look will wow your guests!
Rave Reviews from Friends and Followers
“These Witch Finger Cookies are a Halloween staple in our house! Everyone raves about them at the party!” – Sarah J.
“I made these last year and they were the star of our Halloween gathering. So fun to make with the kids too!” – Mark L.
“I was nervous about making cookies from scratch, but these turned out perfectly! Can’t wait to make them again!” – Emily T.
Creative Variations to Try
- Chocolate Chip Witch Fingers: Add mini chocolate chips into the dough for a sweet surprise!
- Green Tea Matcha Fingers: Incorporate matcha powder into the dough for a unique flavor and vibrant color.
- Spicy Ginger Fingers: Mix in some ground ginger and cinnamon to add a warm, spicy kick.
- Nut-Free Version: Swap almonds for pumpkin seeds for a nut-free alternative that still looks fabulous.
Bonus: Try adding a touch of food coloring to the dough for even spookier effects!
FAQs – All Your Questions Answered!
Can I use margarine instead of butter? While margarine can work, it won’t give you the same rich flavor and texture as butter. For best results, stick with unsalted butter.
How long do these cookies stay fresh? Stored in an airtight container, they can last up to a week. However, they’re so delicious, they probably won’t last that long!
Can I freeze the cookie dough? Absolutely! You can freeze the dough for up to 3 months. Just thaw it in the fridge overnight before baking.
What if my dough is too sticky? If your dough feels too sticky, don’t hesitate to add a bit more flour, one tablespoon at a time, until you can handle it comfortably.
Storage/Serving Tips
- Keep cookies in an airtight container to maintain their crispiness.
- For maximum freshness, store in a cool, dry place away from sunlight.
- Serve them on a spooky platter for added flair at your Halloween party!
Perfect Occasions for Witch Finger Cookies
- Halloween parties
- School bake sales
- Spooky movie nights
- Fall gatherings with friends
- Kids’ Halloween-themed birthday parties
The Complete Recipe
Thank you for sticking with me through all the spooky details! Now, let’s get to the fun part – the recipe for these Witch Finger Cookies!
Witch Finger Cookies
Ingredients
- 1 cup unsalted butter, softened
- 1 cup powdered sugar
- 1 egg
- 1 teaspoon vanilla extract
- 2 ¾ cups all-purpose flour
- ½ teaspoon salt
- ½ teaspoon baking powder
- ½ cup whole almonds, blanched
Tip: Make sure your butter is at room temperature to ensure a smooth dough. Also, using blanched almonds gives a cleaner look for the “fingers.”
Extend ingredients section: If you want to add an extra kick, consider incorporating a teaspoon of almond extract for a more pronounced almond flavor or even a couple of tablespoons of cocoa powder for a chocolatey twist.
Step-by-Step Instructions
Step 1: Prepare Your Dough
In a large mixing bowl, cream together the softened butter and powdered sugar until light and fluffy. This usually takes about 3-5 minutes. The key here is to get as much air into the mixture as possible, which will make your cookies light and crispy!
Step 2: Add the Egg and Vanilla
Beat in the egg and vanilla extract until well combined. The mixture might look a little curdled, but don’t worry! This is normal and will come together once you add the dry ingredients.
Step 3: Combine the Dry Ingredients
In another bowl, whisk together the flour, salt, and baking powder. Gradually add this to your wet mixture, mixing until just combined. Be careful not to overmix, as this can lead to tougher cookies.
Step 4: Chill the Dough
Wrap the dough in plastic wrap and refrigerate for at least 30 minutes. This step is crucial for shaping and helps prevent the cookies from spreading too much while baking.
Step 5: Shape the Cookies
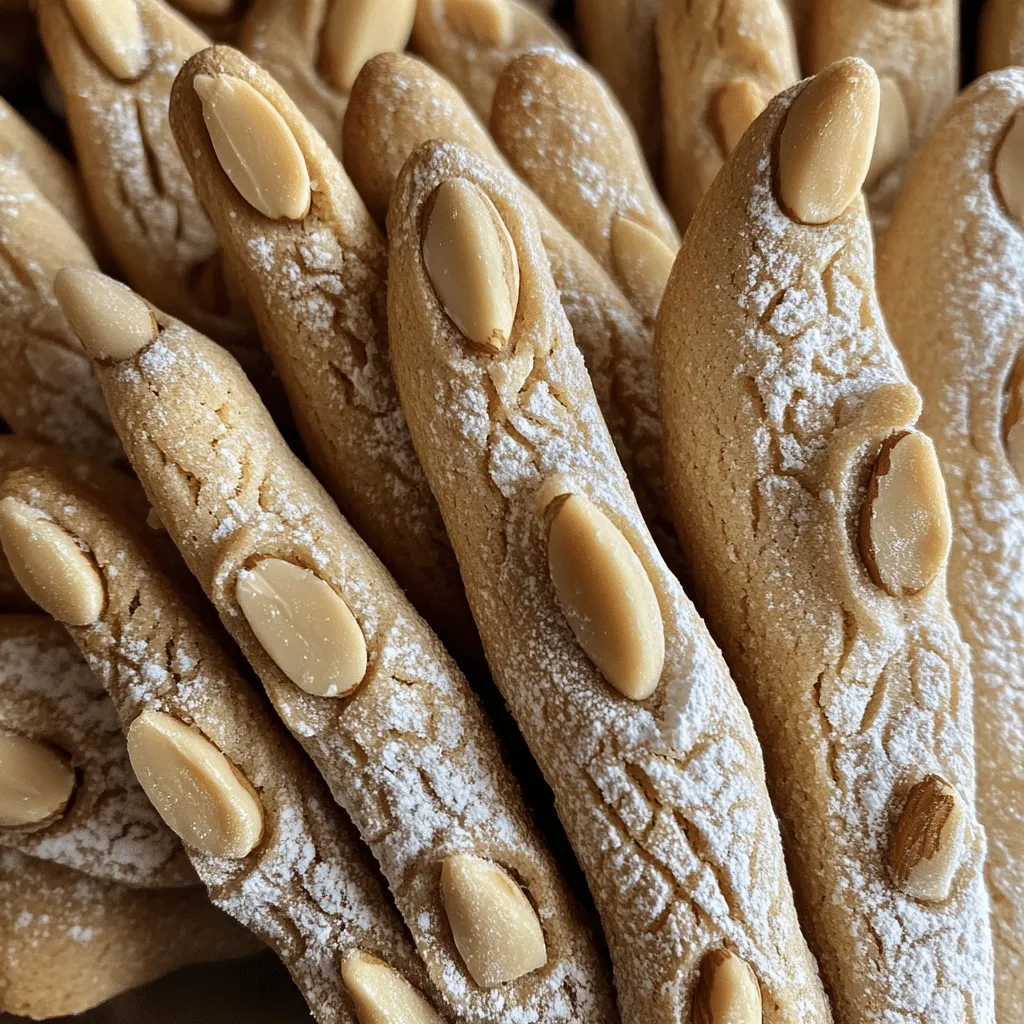
Preheat your oven to 350°F (175°C). Once chilled, remove the dough from the fridge. Take small portions of dough and roll them into finger shapes, about 3 inches long. Don’t forget to create knuckle indentations with your fingers for that eerie look!
Step 6: Add the Almond Tips
Press an almond into the tip of each cookie to create the “finger” look. It’s amazing how this simple addition transforms the cookies into spooky treats!
Step 7: Bake
Place the cookies on a baking sheet lined with parchment paper and bake for 12-15 minutes, or until the edges are slightly golden. The aroma will have you dancing with excitement!
Step 8: Cool and Enjoy
Let the cookies cool on the baking sheet for a few minutes before transferring them to a wire rack to cool completely. Now, the hardest part is waiting until they cool before you take that first bite!
Nutritional Info: Each Witch Finger Cookie contains approximately 120 calories, with 8g of fat and 2g of protein. Enjoy these treats in moderation!
Extend instructions: If you want to impress your guests even further, consider drizzling a bit of melted chocolate over the cookies for a bloody effect or dusting them lightly with powdered sugar for a ghostly touch. The possibilities are endless!