

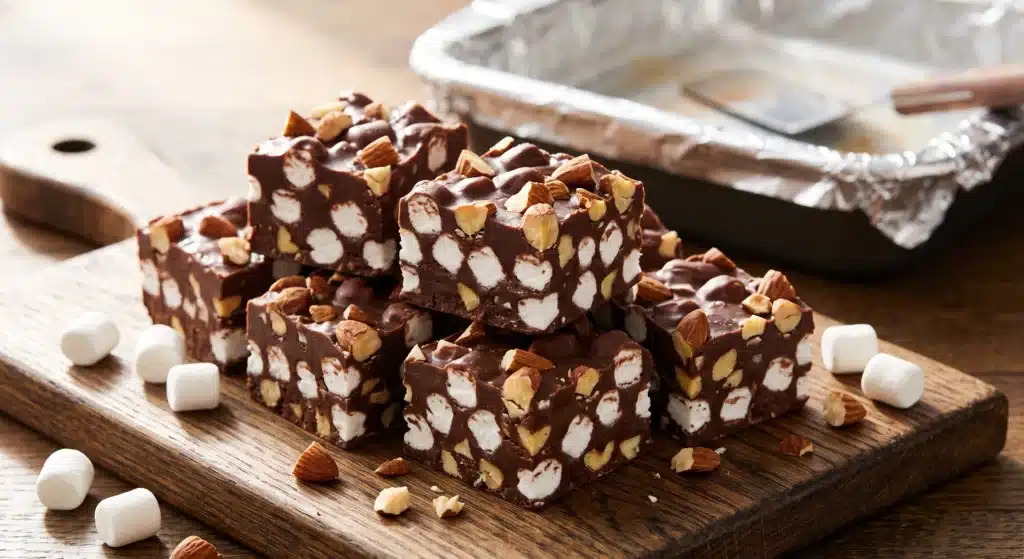
Rich, creamy, and packed with contrasting textures, this easy rocky road fudge is a classic confection that requires minimal effort for maximum reward. The base is an incredibly smooth, melt-in-your-mouth chocolate fudge made without the fuss of boiling sugar or calibrating a candy thermometer. Instead, it relies on a streamlined method of gently melting semi-sweet chocolate with sweetened condensed milk to create a thick, luxurious binder. Folded into that velvety chocolate are soft, pillowy mini marshmallows and crunchy chopped almonds, creating the iconic rocky road flavor profile in every bite.
This dessert strikes the ideal balance between deep chocolate flavor, airy sweetness, and satisfying crunch. It is a fantastic option for holiday dessert platters, casual weekend baking, or whenever a strong chocolate craving strikes. Because it sets up perfectly in the refrigerator, it is also a highly practical make-ahead treat. You can prepare an entire batch in a matter of minutes, let the refrigerator do the hard work, and slice it into neat, presentable squares just before serving. Whether you are an experienced baker or a beginner looking for a foolproof dessert, this quick and straightforward approach to homemade fudge delivers bakery-quality results with standard pantry ingredients.
Why You’ll Love This Recipe
- Simple preparation: There is no need for a candy thermometer, double boiler, or complex sugar-boiling techniques. The process is entirely beginner-friendly and requires only basic mixing.
- Accessible ingredients: The entire dish comes together using just four standard ingredients that are easy to find in any grocery store.
- Quick cooking: The active cooking time takes only a few minutes. The microwave handles the melting process, meaning you spend less time hovering over a hot stove.
- Appealing flavor and texture: Every square offers a delicious contrast between the dense, creamy chocolate fudge, the chewy softness of the marshmallows, and the hearty crunch of the chopped nuts.
- Make-ahead convenience: Fudge actually benefits from being made in advance. You can prepare this days before you plan to serve it, making it incredibly practical for busy holidays or gatherings.
Ingredients You’ll Need
For the Fudge Base
- 1 (14-ounce) can sweetened condensed milk
- 1 (12-ounce) bag semi-sweet chocolate chips (about 2 cups)
For the Mix-Ins
- 1 1/2 cups mini marshmallows
- 3/4 cup chopped almonds
Sweetened condensed milk is the structural foundation of this shortcut fudge. It provides the necessary sugar and concentrated milk solids to create a smooth, dense texture without boiling sugar syrup. The semi-sweet chocolate chips balance the intense sweetness of the condensed milk, providing a deep, robust cocoa flavor and helping the fudge set firmly once cooled. Mini marshmallows add the signature chewy pockets characteristic of the rocky road flavor, while the chopped almonds offer an essential savory crunch to break up the rich chocolate.
Ingredient Notes and Substitutions
If you need to make adjustments based on what you have in your pantry, there are several ways to customize this dish without sacrificing the final texture.
When choosing chocolate, semi-sweet chocolate chips are highly recommended because they balance the sugar in the condensed milk. However, if you prefer a less sweet, more intense flavor, you can substitute dark chocolate chips or chopped dark chocolate baking bars. Using milk chocolate chips will result in a much sweeter, softer fudge, which may be too cloying for some palates but works well if you have a strong sweet tooth.
For the nuts, almonds are a classic and delicious choice, but walnuts, pecans, or roasted peanuts all make excellent substitutions. If you want the best flavor, lightly toast your chosen nuts and allow them to cool completely before folding them into the fudge.
It is absolutely critical that you use sweetened condensed milk and not evaporated milk. Evaporated milk is thin and unsweetened; using it will result in a watery chocolate soup that will never set.
If you cannot find mini marshmallows, you can take standard-sized marshmallows and cut them into quarters using kitchen shears lightly coated in non-stick spray. Do not use marshmallow creme or fluff, as it will blend into the batter and ruin the firm texture of the fudge.
Equipment Needed
- 8×8-inch baking dish
- Aluminum foil or parchment paper
- Large microwave-safe mixing bowl
- Silicone spatula or sturdy wooden spoon
- Sharp, heavy knife for slicing
How to Make the Recipe
- Prepare the baking dish: Line an 8×8-inch baking dish with aluminum foil. Leave a few inches of foil hanging over the edges of the pan. This creates a sling that will allow you to lift the set fudge out of the pan easily later. Lightly coat the foil with non-stick cooking spray or a thin layer of butter to prevent sticking.
- Combine the base ingredients: In your large microwave-safe mixing bowl, pour in the entire can of sweetened condensed milk. Add the semi-sweet chocolate chips on top.
- Melt the chocolate: Place the bowl in the microwave. Heat the mixture on medium power for 30 seconds. Remove the bowl and stir the chocolate and milk together. Return to the microwave for another 30 seconds, then stir again. Repeat this process until the chocolate chips are completely melted and the mixture is thick, glossy, and entirely smooth.
- Cool slightly and fold: Let the warm chocolate mixture sit at room temperature for about two to three minutes. This brief resting period prevents the marshmallows from melting immediately upon contact. Add the mini marshmallows and chopped almonds to the bowl. Use a silicone spatula to gently fold the mixture together until the add-ins are evenly distributed throughout the thick chocolate.
- Spread and chill: Transfer the rocky road mixture into your prepared baking dish. Use your spatula to gently push the fudge into the corners and smooth out the top into an even layer. Place the dish in the refrigerator and chill for at least two hours, or until the fudge is completely firm to the touch.
- Slice and serve: Once the fudge is fully set, use the foil overhang to lift the entire block out of the pan and onto a cutting board. Peel the foil away from the sides. Using a sharp, heavy knife, slice the fudge into neat, even squares.
Tips for the Best Results
- Line the pan generously: Always use the foil or parchment paper sling method. Trying to cut the fudge directly inside the baking dish is difficult and often damages the first few squares you try to remove.
- Stir thoroughly during melting: Chocolate can hold its shape even when melted. Stirring vigorously between each microwave burst distributes the heat and prevents the chocolate from scorching.
- Toast the almonds: For an extra depth of flavor, toast your chopped almonds in a dry skillet over medium heat for a few minutes until fragrant. Let them cool completely before adding them to the chocolate so they retain their crunch.
- Control the temperature: Letting the melted chocolate base cool for just a couple of minutes before adding the marshmallows ensures that the marshmallows maintain their shape. If the chocolate is boiling hot, the marshmallows will melt into white streaks.
- Use a hot knife for clean cuts: To get bakery-worthy, sharp edges on your fudge squares, run your knife under hot water, wipe it completely dry with a towel, and press down firmly to slice. Wipe the blade clean between every single cut.
- Press gently into the pan: When transferring the mixture to the baking dish, do not crush the ingredients. Gently guide the thick batter into an even layer so the marshmallows remain intact and visually appealing.
Common Mistakes to Avoid
- Overheating the chocolate: Microwaving the chocolate and condensed milk for too long without stirring will cause the chocolate to seize, turning it dry, grainy, and unworkable. Always use short bursts of heat and stir well.
- Using evaporated milk: Confusing sweetened condensed milk with evaporated milk is a frequent error. Evaporated milk will not allow the fudge to set properly. Always check the can label carefully.
- Adding water to the bowl: Even a single drop of water in the microwave-safe bowl can cause the melting chocolate to seize and clump. Ensure all your bowls and utensils are bone-dry before starting.
- Slicing the fudge too early: Patience is key. If you try to cut the fudge before it has chilled for at least two hours, it will be sticky, messy, and lose its square shape. It must be entirely firm before slicing.
Serving Suggestions
This easy rocky road fudge is incredibly rich, so it is best served cut into small, bite-sized squares. It makes a stunning addition to any holiday dessert table, sitting beautifully alongside sugar cookies, gingerbread, and peppermint bark. Because it travels well, it is an excellent candidate for gifting. Pack the squares into decorative tins lined with wax paper to give to neighbors, teachers, or coworkers.
For a casual dessert, serve these chocolate squares alongside a hot beverage. The intense sweetness pairs wonderfully with a strong, dark cup of coffee or an unsweetened espresso. You can also chop leftover fudge into smaller pieces and sprinkle it over a bowl of vanilla bean or coffee ice cream for an indulgent sundae topping.
Storage and Reheating
Proper storage is essential to keep the fudge tasting fresh and maintaining its creamy texture.
To store at room temperature, place the sliced fudge in an airtight container. Keep it in a cool, dark place away from direct sunlight or heat sources. It will stay fresh at room temperature for up to one week.
For longer storage, refrigerating the fudge is highly recommended. Place the squares in an airtight container, separating any layers with a sheet of wax paper or parchment paper so they do not stick together. The fudge will keep well in the refrigerator for two to three weeks. You can serve it cold straight from the fridge or let it sit at room temperature for ten minutes to soften slightly.
If you want to freeze the fudge, wrap the entire uncut block tightly in plastic wrap, then wrap it again in aluminum foil to prevent freezer burn. Alternatively, freeze sliced squares in an airtight container with wax paper between the layers. It will freeze beautifully for up to two months. To thaw, transfer the fudge to the refrigerator overnight before eating. Do not attempt to microwave or reheat the fudge to soften it, as this will melt the chocolate and ruin the texture.
Frequently Asked Questions
Can I make this recipe on the stovetop instead of the microwave?
Yes, you can easily adapt this to the stovetop. Create a double boiler by placing a heat-safe bowl over a pot of simmering water, ensuring the bottom of the bowl does not touch the water. Add the condensed milk and chocolate chips to the bowl, stirring constantly until completely melted and smooth. Remove from the heat before folding in the marshmallows and nuts.
Why did my chocolate become hard and grainy?
If your chocolate mixture becomes grainy or stiff, it has seized. This usually happens for two reasons: either a drop of water got into the bowl, or the chocolate was overheated. To prevent this, ensure all equipment is completely dry and heat the chocolate in very short increments, stirring frequently.
Can I double this recipe?
Yes, this recipe scales up beautifully. If you double the ingredients, you will need to use a 9×13-inch baking dish instead of an 8×8-inch dish. The microwave time may also increase slightly, but continue to use the 30-second increment method to be safe.
Can I leave the nuts out?
Absolutely. If you have a nut allergy or simply prefer a smoother texture, you can omit the almonds entirely. You can replace them with crushed graham crackers or pretzels if you still want a crunchy element, or simply leave the marshmallows as the only mix-in.
How do I know when the fudge is fully set?
The fudge is ready when the surface is completely firm to the touch and no longer looks wet or glossy. If you press a finger gently into the center, it should not leave a deep indentation. This typically takes a full two hours in the refrigerator.
Final Thoughts
Making a spectacular dessert does not have to involve spending hours in the kitchen or wrestling with complicated candy-making techniques. By combining a few smart pantry staples and utilizing the microwave, you can create a dense, chewy, and crunchy treat that rivals any fancy confectionary shop. Give this easy rocky road fudge a try the next time you need a reliable, crowd-pleasing dessert, and enjoy the perfect harmony of rich chocolate, soft marshmallows, and toasted almonds.