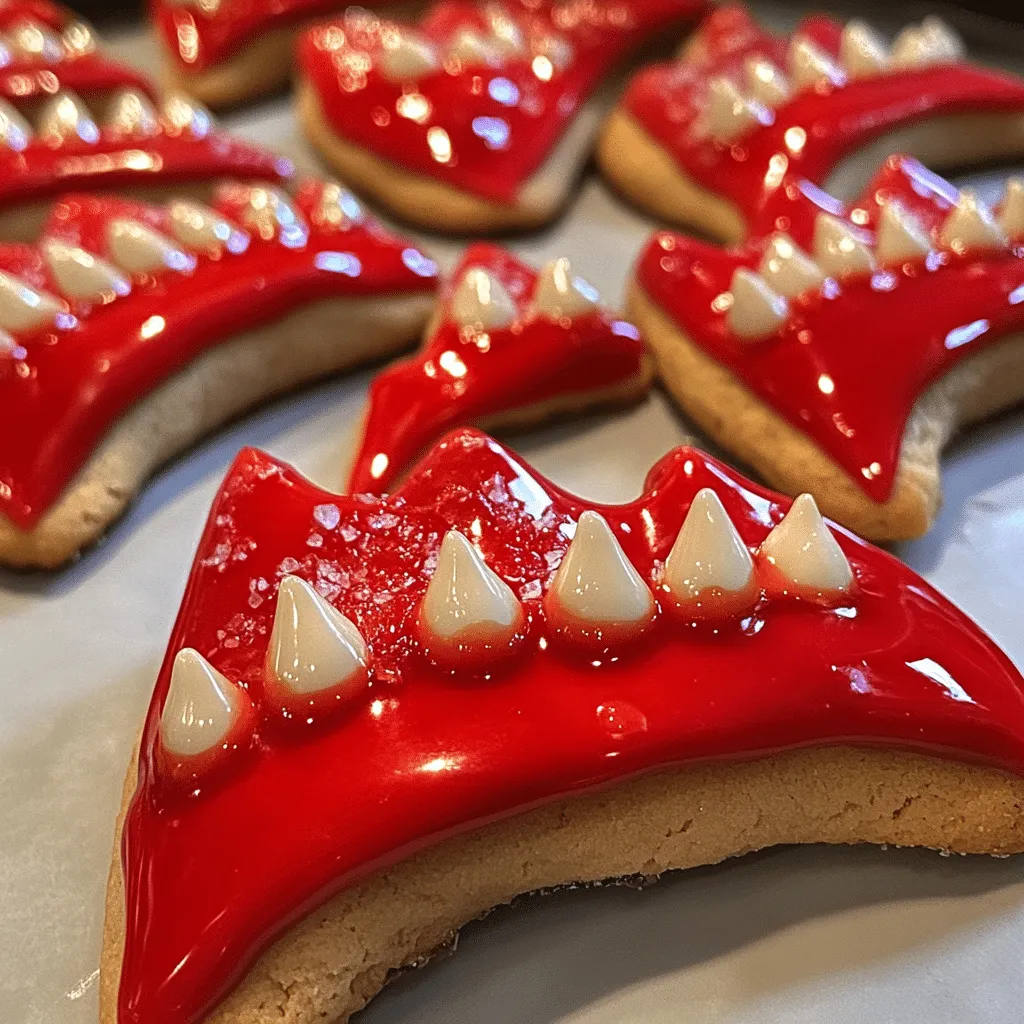
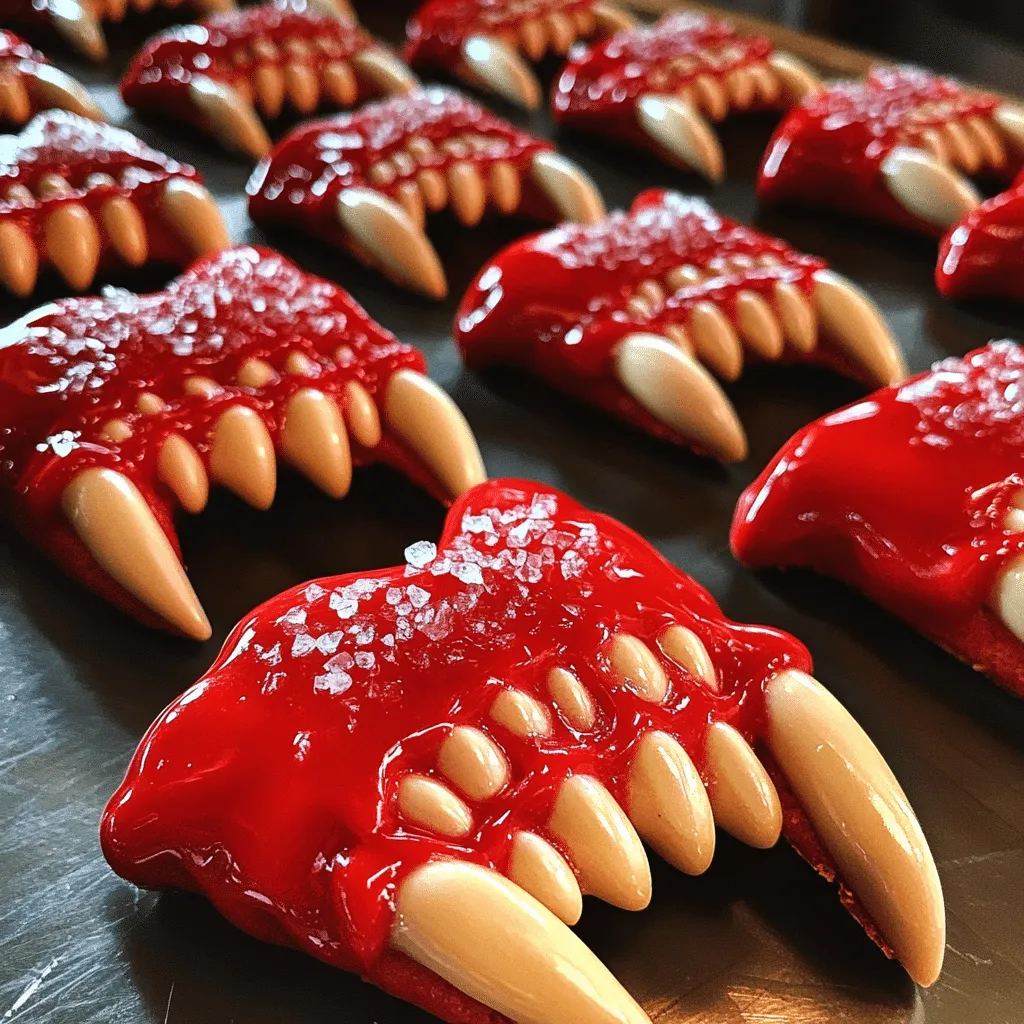
Hey there, fellow baking enthusiasts! I can’t wait to share my absolute favorite Halloween treat with you: Crispy Blood-Red Vampire Teeth Cookies! Trust me, I’ve made these a dozen times for Halloween parties, and each time, they vanish faster than you can say “Trick or Treat.” The excitement on my friends’ faces when they take their first bite is priceless. So, roll up your sleeves and get ready for a baking adventure that’s as fun as it is delicious!
Why You’ll Love This Recipe
- Easy to Make: Even if you’re a beginner, these cookies are straightforward and fun to whip up.
- Visually Stunning: The vibrant red color and spooky design will wow your guests!
- Perfect for Any Occasion: These cookies are not just for Halloween. They’re great for themed parties, school events, or just because!
- Deliciously Sweet: With a crispy texture and sweet flavor, they’re sure to please any sweet tooth.
- Make Ahead Convenience: You can prepare the dough in advance, making party planning a breeze!
The Secret to Perfect Vampire Teeth Cookies
The magic behind these cookies lies in a few key techniques. First off, it’s all about the chilling time. Chilling the dough not only makes it easier to shape but also results in a more defined cookie after baking. I promise, this step is a game-changer! Another tip? Don’t skimp on the red food coloring! You want those cookies to scream Halloween from a mile away. Plus, a sprinkle of sea salt on top adds an incredible contrast that elevates the sweet flavor. Trust me, once you nail these techniques, you’ll be the star of any Halloween gathering!
Rave Reviews from Friends and Followers
“These Vampire Teeth Cookies were a massive hit at my Halloween party! I’m still getting compliments weeks later!” – Sarah J.
“I made these for my kids and they loved helping out. We had so much fun, and they tasted amazing!” – Mike T.
“The best cookies I’ve ever made for Halloween! They looked so impressive and were super easy to decorate.” – Lisa K.
Creative Variations to Try
- Chocolate Chip Vampire Teeth: Add chocolate chips to the dough for an extra sweet surprise.
- Red Velvet Version: Swap in red velvet cake mix for a richer flavor and soft texture.
- Nutty Surprise: Mix in chopped nuts or a nut butter for a crunchy twist.
- Spiced Up: Add a pinch of cinnamon or nutmeg to the dough for a warming fall flavor.
Bonus: Use cookie cutters to create different spooky shapes like bats or ghosts for added fun!
FAQs – All Your Questions Answered!
Can I make the dough in advance? Absolutely! You can store the dough in the fridge for up to three days or freeze it for up to a month. Just let it thaw in the fridge before baking.
What if I don’t have red food coloring? You can use beet juice as a natural alternative, but be prepared for a slightly different hue!
How do I store leftovers? Store the cookies in an airtight container at room temperature for up to a week.
Can I substitute any of the ingredients? Yes! You can use gluten-free flour or sugar substitutes to suit dietary needs without sacrificing taste.
Storage/Serving Tips
- Store cookies in an airtight container to keep them fresh.
- They can last up to one week at room temperature or longer in the fridge.
- For serving, arrange them on a spooky platter with some fake spider webs for a dramatic effect!
Perfect Occasions for Vampire Teeth Cookies
- Halloween parties
- School bake sales
- Spooky movie nights
- Fall festivals
- Kids’ birthday parties with a Halloween theme
- Trick-or-treat gatherings
The Complete Recipe
Thank you for staying with me! Now, let’s get to the good stuff — the recipe for these Crispy Blood-Red Vampire Teeth Cookies!
Vampire Teeth Cookies
Ingredients
- 2 ¾ cups all-purpose flour
- 1 teaspoon baking powder
- ½ teaspoon baking soda
- 1 cup unsalted butter, softened
- 1 cup granulated sugar
- ½ cup packed brown sugar
- 2 large eggs
- 1 teaspoon vanilla extract
- 1 tablespoon red food coloring (more for a deeper color)
- ½ teaspoon salt
- Optional: Sea salt for topping
Tip: Make sure your butter is at room temperature for the best texture. If you forget to take it out, just microwave it in short intervals (about 10 seconds) until slightly softened.
Extend ingredients section: Feel free to experiment with the flour type; almond flour can give a nutty taste. If you want to reduce sugar, you can substitute a portion with unsweetened applesauce for moisture and sweetness.
Step-by-Step Instructions
Step 1: Preheat and Prep
Preheat your oven to 350°F (175°C). Line baking sheets with parchment paper. This prep stage is crucial as it ensures even baking and easy cleanup!
Step 2: Mix Dry Ingredients
In a medium bowl, whisk together the flour, baking powder, baking soda, and salt. This step helps to evenly distribute the leavening agents and ensures your cookies rise perfectly.
Step 3: Cream Butter and Sugars
In a large bowl, beat together the softened butter, granulated sugar, and brown sugar until the mixture is light and fluffy, about 2-3 minutes. This is where the magic begins; a good creaming will create a light texture in your cookies!
Step 4: Add Eggs and Flavorings
Beat in the eggs, one at a time, followed by the vanilla extract and red food coloring. The dough should now start to take on that glorious blood-red hue. Don’t be afraid to add more food coloring if you want to amp up the spooky factor!
Step 5: Combine Wet and Dry Ingredients
Gradually add your dry ingredients to the wet mixture, stirring until just combined. Over-mixing can lead to tough cookies, so be gentle!
Step 6: Chill the Dough
Cover the dough with plastic wrap and refrigerate for at least 30 minutes. This step is vital for achieving the perfect shape and texture!
Step 7: Shape and Bake
Using a tablespoon, scoop out portions of dough and shape them into teeth-like forms. Place them on the prepared baking sheets about 2 inches apart. If you’re feeling creative, you can add a bit of sea salt on top for an extra crunch. Bake for 10-12 minutes until the edges are golden. The cookies will firm up as they cool, so don’t worry if they seem soft at first!
Step 8: Let Cool
Remove from the oven and allow them to cool on the baking sheet for 5 minutes before transferring them to a wire rack. This cooling time is crucial to maintain their structure!
Nutrition Info: Each cookie contains approximately 150 calories, making them a sweet treat that’s hard to resist. And remember, moderation is key!
Final Thoughts
I hope you’re as excited to make these Crispy Blood-Red Vampire Teeth Cookies as I am! They’re not just a treat; they’re a fun experience that brings friends and family together in the kitchen. The vibrant color, delightful taste, and spooky design make